Windows: Setting the Eclipse Preferences
Eclipse has the notion of a workspace, which is a collection of
one or more projects. Ptolemy II is a project.
(Optional): To add Eclipse to your start menu, go to the
directory where Eclipse is installed, right click on eclipse.exe
and select Pin to Start Menu.
Start up Eclipse by clicking on eclipse.exe.
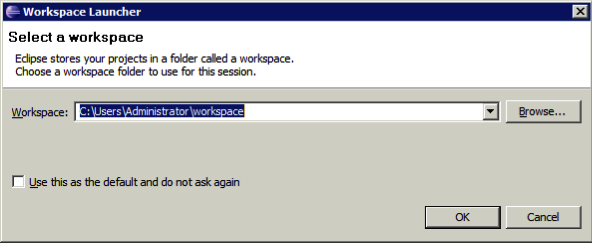
When the "Workspace Launcher" window comes up, either stick with the default
or choose a new directory. Note that the projects can be located outside
of the workspace directory. One caveat is that Eclipse will not permit
the project directory to be a parent of the workspace directory, so placing the
workspace in a subdirectory such as the default location is best.
Click "OK" to create the workspace and open Eclipse.
Below is the Workspace Launcher Window:
The "Usage Data Upload" window may appear. The Eclipse
developers use this facility to see how Eclipse is used. We
recommend selecting "Turn UDC Off" and clicking "Finish".
The default configuration of Eclipse has some difficulties with Ptolemy II,
so a few changes are necessary.
- Eclipse requires some customization to build Ptolemy II
and to keep the Ptolemy II coding style.
In the steps below, we
outline changes to be made in the Eclipse Preferences window.
Under Windows, the Eclipse Preferences window
is invoked via Windows | Preferences.
For each of the
changes, hit Apply. When all the changes are done, hit
OK, which will close the Eclipse Preferences Window.
- By default, Eclipse rebuilds a project when any change is made
to a file. This will result in thousands of errors when Ptolemy II
is first checked out, and during normal usage, can be annoying because
of the pauses it creates. We suggest disabling this feature as
follows:
- While still in the preferences window
(Window | Preferences)
- Select
General | Workspace
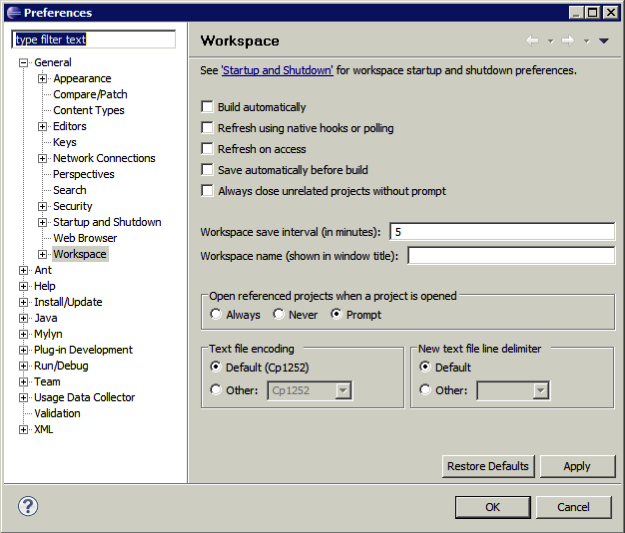
- Deselect
Build automatically.
- Click Apply.
Below is the General | Workspace window:
- Ptolemy II source files are worked on by many people with different
editors. Unfortunately, different text editors interpret tab
characters differently, so it is best to use spaces rather than tabs.
Sadly, the Eclipse developers have chosen to use tabs
as spaces, so you must adjust the Eclipse Java Formatter
if you plan on contributing code to the Ptolemy II tree.
Also, it is best if files end with new line characters, so
that we can run line oriented scripts on them.
In addition, we currently do not want the Eclipse
Formatter to format comments because some of the comments
include ASCII art diagrams. We hope to change this policy in
the future.
We handle these changes together:
- While
still
in the preferences window
(Window | Preferences)
- Go to
Java | Code Style | Formatter and click New and go through the steps below, or click Import and select PtolemyIICodeStyle.xml (download here).
- In the "New Profile" Window, for the Profile name, enter "Ptolemy II"
Under "Initialize settings with the following profile",
select "Java Conventions [built-in]"
(We use Java Conventions over the "Eclipse"
setting because the Eclipse style uses tabs.)
Then hit OK
- Under the "Indentation" tab, change the Tab policy to "Spaces only"
- Under the "New Lines" tab, select "at end of file"
- Under the "Comments" tab,
unselect "Enable Javadoc comment formatting"
unselect "Enable block comment formatting", otherwise the block comments that have <pre> ... <pre> get changed.
unselect "Enable line comment formatting", otherwise the headers for public methods etc. get changed.
- Click OK.
- In the Preferences Window, click Apply.
- Eclipse has very good compiler error/warning. One of the
warnings complains if a Serializable class does not have
serialVersionUID declared. Since this warning is only useful
if you are tightly managing serialization, we turn it off:
- While still in the preferences window
(Window | Preferences)
Expand Java | Compiler | Errors/Warning
- Under "Potential programming problems", change
"Serializable class without serialVersionUID" to "Ignore"
- Under "Generic Types", change
"Unchecked generic type operation" to "Ignore".
- Under "Generic Types", change
"Usage of a raw type" to "Ignore".
- Click Apply. If you are prompted for a full rebuild, click Yes.
- The PtDoc Doclet in
$PTII/doc/doclets/PtDoclet.java
requires tools.jar,
While still in the preferences window:
Java | Installed JREs, tools.jar must be added the external jars:
- Select the default JRE |
Edit | Add External Jars.
- Browse to the path of your JDK for example:
32 bit: c:\Program Files (x86) \Java\jdk1.6.0_23\lib
64 bit: c:\Program Files\Java\jdk1.6.0_23\lib
- Hit
Open, select tools.jar and then finish.
- Click OK in the Preferences window to apply all of the above changes.
- Proceed to the next step, Setting up the ptII project