The instructions below include how to set up Subversion so that it is possible to update the Ptolemy II tree. If you would like to work from a static source tree, such as what is shipped with the release, see the Simple Eclipse Instructions.
Please see
http://chess.eecs.berkeley.edu/ptexternal/nightly/doc/eclipse/index.htmfor updated Eclipse instructions.
These instructions assume you are using Eclipse Helios under Windows or Mac OS X. Other ways of setting up and building Ptolemy II are described on the Ptolemy II install page.
Contents of this page:
Other local pages:ptolemy/backtrack/ from the build.
Eclipse is available as both 32-bit and 64-bit binaries. Deciding which one to download can be complex.
The basic idea is that to use a 64-bit version of Eclipse, you must have a 64-bit JVM and an operating system that will support 64-bit applications. When in doubt, choose the 32-bit version of Eclipse, it is more likely to work than the 64-bit version.
See below for details.
uname -a. If the result
contains x64, you are running a 64-bit version of Linux and
would select the 64-bit version of Eclipse.. Also,
try java -version. Below is a run on a 64-bit Linux
machine:
-bash-3.2$ uname -a
Linux sisyphus.eecs.berkeley.edu 2.6.18-164.11.1.el5xen #1 SMP \
 Wed Jan 6 13:43:33 EST 2010 x86_64 x86_64 x86_64 GNU/Linux
-bash-3.2$ java -version
java version "1.5.0_22"
Java(TM) 2 Runtime Environment, Standard Edition (build 1.5.0_22-b03)
Java HotSpot(TM) 64-Bit Server VM (build 1.5.0_22-b03, mixed mode)
2010-10-10 11:50:02.263 java[7823:613] java.lang.NullPointerException
at apple.awt.CToolkit.postEvent(CToolkit.java:1086)
at apple.awt.EventFactoryProxy.forwardEvent(EventFactoryProxy.java:53)
The bug happens when running from Eclipse or from the command line. The bug requires UI interactions such as mouse movement or clicking. The bug is probably a threading bug and may only show up on multi-core machines. The downside is that when the bug occurs, the debugging session in Eclipse may become non-responsive.
For further information, see:
http://lists.apple.com/archives/java-dev/2010/May/msg00140.html.
So, at this time, we are recommending the 32-bit version with Java 1.5.
Download
eclipse-rcp-helios-SR1-macosx-cocoa.tar.gz
uncompress it and move eclipse/ into /Applications, which
will create /Applications/eclipse/Eclipse.app.
Firefox Mac OS X Details:
/Downloads
eclipse-rcp-helios-SR1-macosx-cocoa.tar.gz
which will create the eclipse directory.
eclipse directory to your
Applications directory.
eclipse.ini.
/Applications/eclipse,
find the Eclipse executable and right click (Control + click)
and choose "Show Package Contents".
Contents/MacOS and double click on
eclipse.ini, which will open up the file in TextEdit
-vm /System/Library/Frameworks/JavaVM.framework/Versions/1.5/Home/bin/java
-vmargs line.
eclipse.ini, see
http://wiki.eclipse.org/Eclipse.ini
Eclipse | About Eclipse
| Installation Details | Configuration.
java.class.version property should be
49.0.
java.vm.name property might
have the string 64 in it.
http://windows.microsoft.com/en-US/windows7/32-bit-and-64-bit-Windows-frequently-asked-questions.
for details.
C:\Program Files, which will
create C:\Program Files\eclipse\eclipse.exe.
eclipse\eclipse.exe is not created, then it could
be that the security policy on your machine is preventing the creation
of .exe files. If this is the case, then try right
clicking on the zip file, select "Properties" and then at the bottom,
hit "Unblock" and then "Apply". Or try running
unzip from the command line.
/Applications/eclipse/Eclipse.app or eclipse/eclipse.exe.
eclipse.exe and a dll executable:
chmod a+x eclipse.exe
eclipse directory.
find . -name *.dll -exec chmod a+x {} \;
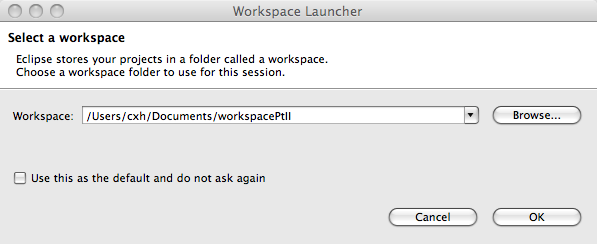
Eclipse has the notion of a workspace, which is a collection of
one or more projects. Ptolemy II is a project.
When the "Workspace Launcher" window comes up, either stick with the default
or choose a new directory. Note that the projects can be located outside
of the workspace directory. One caveat is that Eclipse will not permit
the project directory to be a parent of the workspace directory, so placing the
workspace in a subdirectory such as the default location is best.
Click "OK" to create the workspace and open Eclipse.
Below is the Workspace Launcher Window:
Applications/eclipse, drag the
Eclipse.app icon to the Finder Dock on the edge of your
screen. This will give you fast access to starting Eclipse.
eclipse.exe by going to the
directory where Eclipse is installed, right clicking on eclipse.exe
and selecting Create Shortcut.
Pin to Start Menu
eclipse.ini file.
Window | Preferences.
Eclipse | Preferences.
Apply. When all the changes are done, hit
OK, which will close the Eclipse Preferences Window.
Eclipse | Preferences)
Window | Preferences)
General | Workspace
Build automatically.
General | Workspace window:

Eclipse | Preferences)
Window | Preferences)
Java | Code Style | Formatter and click
New
ptolemy/actor/ptalon uses generics,
which require Java 1.5 (aka Java 5.0) or later.
However, the Ptolemy II development trunk that includes changes after
Ptolemy II 8.0 uses some features of Java 1.6 (aka Java 6.0).
In particular, ptdb to uses javax.swing.GroupLayout.
which requires Java 1.6 (also known as 6.0) or later.
Eclipse | Preferences)
Window | Preferences)
Java | Compiler
Eclipse | Preferences)
Window | Preferences)
Java | Compiler | Errors/Warning
$PTII/doc/doclets/PtDoclet.java
requires tools.jar, which is only in the Java Development
Kit (JDK), not the Java Runtime Environment (JRE). So, be sure that a
JDK is selected for building, not a JRE.
Eclipse | Preferences)
Window | Preferences)
Java | Installed JREs
JVM 1.5.0.
JVM 1.6.0.
tools.jar must be added the external jars:
Edit | Add External Jars.
c:\Program Files\Java JDK1.6.0_22\lib
Open, select tools.jar and then finish.
Eclipse will manage your ptII code tree as a project called the ptII project. There several ways to set up the ptII project,
svn) from the command line).
svn) from the command line).
svn command).
Please choose one of the methods below to set up Eclipse for Ptolemy II.
http://ptolemy.eecs.berkeley.edu/ptolemyII/ptIIlatest
.classpath file to set paths and exclude files.
There are two choices:
.classpath.default to .classpath.
This choice is the simpler choice, but might exclude optional
third party packages.
./configure. This choice is more complex,
especially for Windows users. However, this choice will include
optional third party software that is already installed on your
machine.
.classpath. One solution
is to follow the instructions from:
http://www.macworld.com/article/51830/2006/07/showallfinder.html:
/Utilities/Terminal.app. Enter:
defaults write com.apple.Finder AppleShowAllFiles YES
/Utilities/Terminal.app
cd /Applications/Ptolemy/ptII8.0.1
cp .classpath.default .classpath
c:\Ptolemy\ptII8.0.1.
.classpath and select delete.
.classpath.default, select copy.
.classpath.default.
OR
configureThe procedure below will modify the .classpath file
that is provided in the version control repository to customize it
for the software that you have installed.
- (Mac OS X): Using the Terminal to run configure
- Start up the Terminal application, which may be found as
/Utilities/Terminal.app
- In the Terminal, change to the directory where the Ptolemy II
source code was installed. For example:
cd /Applications/Ptolemy/ptII8.0.1
- Set
$PTII to the location of the source tree:
export PTII=`pwd`
- Make
configure executable.
chmod a+x configure
- Run
./configure
./configure
- (Windows): Install Cygwin and run configure
Unfortunately Windows does not ship with Unix shell commands
like
make. The workaround is to install Cygwin,
see http://ptolemy.eecs.berkeley.edu/ptolemyII/ptIIlatest/cygwin.htm
- Start up the Cygwin Bash shell:
Start | Run | Cygwin
- Change to the directory where the Ptolemy II source code was
installed. For example:
cd c:/Ptolemy/ptII8.0.1
Note that if there are spaces in the path name to the directory
where your Ptolemy installation is located, then you should use
double quotes around the path:
cd "c:/Documents and Settings/yourLogin/workspace/ptII"
- Set
$PTII to the location of the Ptolemy II source tree:
export PTII=c:/Ptolemy/ptII8.0.1
Again, if there are spaces in the path, use double quotes:
export PTII="c:/Documents and Settings/yourLogin/workspace/ptII"
- Run:
./configure
This will create $PTII/.classpath
- If Eclipse is not running, start up Eclipse
- In Eclipse, do
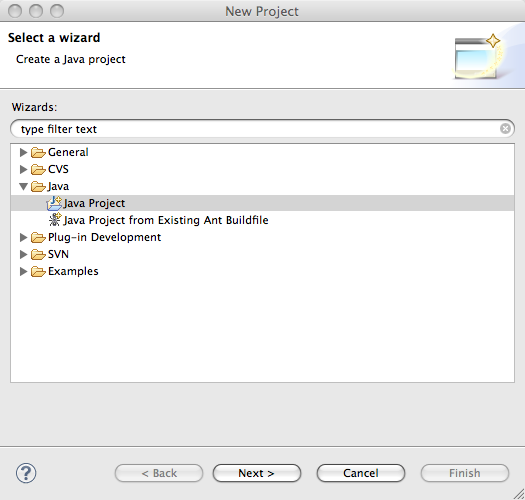
File | New | Project.
- In the "New Project" window, select "Java" > "Java project", Click Next.
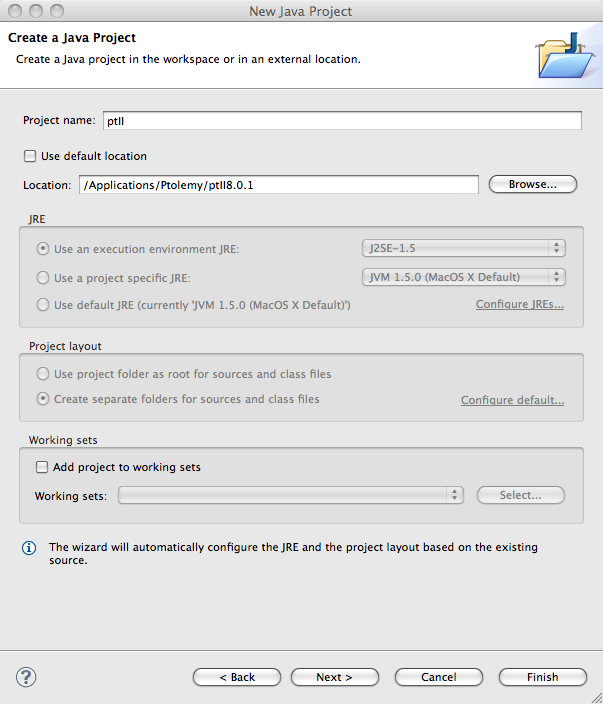
- In the "New Java Project" window:
In "Project Name", enter any project name, ptII
is a common choice.
Uncheck "Use default location" and browse to the location of
the source tree.
(Mac OS X): For example, browse to /Applications/Ptolemy/ptII8.0.1
Press "Next". There might be a delay as Eclipse scans your ptII tree.
Below is the New Java Project window:
Warning: If the "Setting Build Paths" window comes up with a message
"The output folder has changed. Do you want to remove all generated resources
from the old location ptII/bin", then the problem is that the
.classpath file was not found. It is best if you exit
Eclipse, create the .classpath file and redo the above steps.
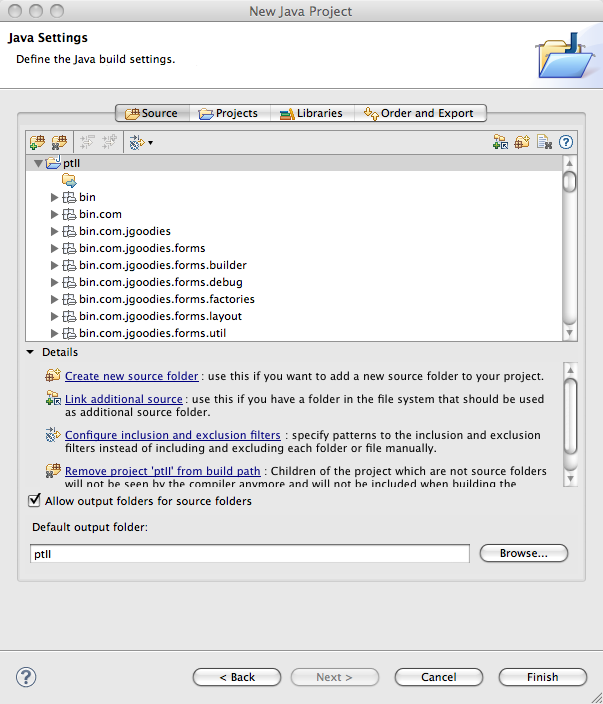
- In the "New Java Project" window, select
"Allow output folders for source folder", then click "Finish"
Below is the second New Java Project window:
- When asked if you want to shift to the Java perspective, click on Yes.
- Under the "Project" menu choice, select "Build All",
"Run in background" and then "Build Automatically"
- The workspace will take a few minutes to build.
- Go to Running Ptolemy II below.
svn help.
svn co svn://source.eecs.berkeley.edu/chess/ptII/trunk ptII
svn:// because
they will be accessing the tree with read-only Subversion access.
source.eecs.berkeley.edu, then check out ptII with
read/write access:
svn co svn+ssh://source.eecs.berkeley.edu/chess/ptII/trunk ptII
Or, if your user id on source.eecs is different than your current user id
on your machine:
svn co svn+ssh://yourID@source.eecs.berkeley.edu/chess/ptII/trunk ptII
.classpath.default. below.
File | New | Project,
select 'Java project'.
In the 'Contents' box, click on 'Create project from existing source'
and browse to the PTII directory. Finish.
There are at least two Subversion plugins for Eclipse, Subversive and Subclipse. Either will work, for a brief comparison, see Subclipse vs. Subversion. The instructions below are for Subversive. To use Subclipse, see Installing Subversion (SVN) into Eclipse.
The Subversive
Eclipse plug-in adds Subversion to Eclipse. After installation,
you can use either Eclipse to manage your project, or the svn
from the command line.
Follow the Subversive installation instructions or these instructions below
Help | Install New Software
Help | Software Updates | Available Software.
- In the "Work with" field, select "Helios - http://download.eclipse.org/releases/helios" from the drop down.
Expand the "Collaboration" tab and check the box next to
"Subversive SVN Team Provider (Incubation)"
- Then click
Next, Next again and click
through the license agreement and hit Finish When the "Software Updates" window appears and asks about a
restart, select "Restart Now" and restart.
- When Eclipse restarts, bring up the preferences window:
(Mac OS X: Eclipse | Preferences)
(Windows: Window | Preferences)
Then do Team | SVN. When you click
on the SVN, the "Subversion Connector Discovery" window
will pop up. (See http://www.polarion.com/products/svn/subversive/connector_discovery.php
for details.)
- In the "Subversion Connector Discovery" window, what version
you select depends on what version of svn is installed on your
machine.
If svn --version returns 1.4, then install SVN Kit 1.1.7
If svn --version returns 1.5, then install SVN Kit 1.2.3
If svn --version returns 1.5, then install SVN Kit 1.3.0
Note: if you install a more recent version of the plugin than the
version of the command line svn tool, then
you will not be able to use the command line svn to
update or modify the tree that is checked out by Eclipse.
If you
run svn on a tree checked out by Eclipse and get a message svn: This client is
too old to work with working copy '.'; please get a newer Subversion
client, then the solution is to update
svn.
Then do "Finish", "Next", "Next", Accept the license and then
"Finish".
- If you get a security warning about unsigned software, click
"OK".
- When prompted for a restart, select "Restart Now".
ls -ltr will
quickly show which files were changed when
To change the Subversion configuration, hunt for the
.subversion/config file.
Under Windows with Cygwin, you
might find it as On the Mac, try If the directory does not exist, try running Make this change to In addition, we would like keyword strings like
Find the See Subversion Users: Re: Setting svn:eol-style
and BTW - To set the style on already checked in file, run:
Note: Most users will not need to do this configuration
because they will be accessing the tree
with read-only Subversion access. Read-only users can
skip to Check Out Ptolemy II from the Subversion repository
To access the ptII repository with read/write access, you will
need configure Subversive to use your password. If don't do this step
and you leave the default
settings, and have Cygwin ssh installed, then
The fix is to set Subversive to use SVNKit
Eclipse will manage your ptII code tree as a project called
the ptII project. Assuming Eclipse is running:
Note: Most users will select
$HOME/.subversion/config. Another place to look
is c:/Documents and Settings/yourlogin/Application Data/Subversion/config.
Build All.
(If Build All is greyed out, then perhaps "Build Automatically" was
not disabled and Ptolemy has been built. See above for more about Build Automatically.)
You will get many warnings that you can ignore, but hopefully no errors.
/Users/yourlogin/.subversion.
svn --version to create the directory.
.subversion/config
### Set use-commit-times to make checkout/update/switch/revert
### put last-committed timestamps on every file touched.
use-commit-times = yes
Tell Subversion to automatically set the eol style
With the default settings, if you use Subversion to add a makefile,
then the file will be checked in with binary settings. When the
file is checked on out non-Windows platforms, then the file will have
\r\n characters, which will break Solaris /usr/ccs/bin/make and cause other problems.
$Id: eclipse.htm 59655 2010-10-22 23:48:15Z cxh $ to be automatically expanded and updated.
.subversion/config file and uncomment the
enable-auto-props line so that it looks like:
enable-auto-props = yes
Also, uncomment the [auto-props] and the section below that
sets the properties for the files. Also, set props for
at least makefile, *.tcl and *.mk files.
See $PTII/doc/coding/svn-config-auto-props.txt for a more complete set of properties.
The bottom of the .subversion/config file should look like:
### Settings for your ~/.subversion/config file. To use this:
### 1) Edit your ~/.subversion/config file
### 2) Insert the contents of this file into your
### ~/.subversion/config file
### 3) You must set "enable-auto-props" to yes
### BEFORE the [auto-props] line.
### _BE_SURE_ to check that [auto-props] does NOT appear twice
### If you append the contents of this file at the end
### Of your config file, you will need to comment out
### the preexisting [auto-props] line.
### Set enable-auto-props to 'yes' to enable automatic properties
### for 'svn add' and 'svn import', it defaults to 'no'.
### Automatic properties are defined in the section 'auto-props'.
### For this to work, the "enable-auto-props = yes" line should
### be before the "[auto-props]" line.
enable-auto-props = yes
[auto-props]
### Section for configuring automatic properties.
### The format of the entries is:
### file-name-pattern = propname[=value][;propname[=value]...]
### The file-name-pattern can contain wildcards (such as '*' and
### '?'). All entries which match will be applied to the file.
### Note that auto-props functionality must be enabled, which
### is typically done by setting the 'enable-auto-props' option.
###
### NOTE: There is a bug in svn-1.5 and earlier where lines
### that differ only in case cause problems - only the first
### line is read. See
### http://subversion.tigris.org/issues/show_bug.cgi?id=2036
###
*.MF = svn:eol-style=native;svn:keywords=Author Date Id Revision
*.aart = svn:eol-style=native;svn:keywords=Author Date Id Revision
*.ac = svn:eol-style=native;svn:keywords=Author Date Id Revision
*.am = svn:eol-style=native;svn:keywords=Author Date Id Revision
*.apt = svn:eol-style=native;svn:keywords=Author Date Id Revision
*.avi = svn:mime-type=video/avi
*.bat = svn:eol-style=native;svn:keywords=Author Date Id Revision
*.bsh = svn:eol-style=native;svn:keywords=Author Date Id Revision
*.c = svn:eol-style=native;svn:keywords=Author Date Id Revision
*.cat = svn:eol-style=native;svn:keywords=Author Date Id Revision
*.cgi = svn:eol-style=native;svn:keywords=Author Date Id Revision
*.classpath = svn:eol-style=native;svn:keywords=Author Date Id Revision
*.cmd = svn:eol-style=native;svn:keywords=Author Date Id Revision
*.cnd = svn:eol-style=native;svn:keywords=Author Date Id Revision
*.conf = svn:eol-style=native;svn:keywords=Author Date Id Revision
*.config = svn:eol-style=native;svn:keywords=Author Date Id Revision
*.cpp = svn:eol-style=native;svn:keywords=Author Date Id Revision
*.css = svn:eol-style=native;svn:keywords=Author Date Id Revision
*.cwiki = svn:eol-style=native;svn:keywords=Author Date Id Revision
*.data = svn:eol-style=native;svn:keywords=Author Date Id Revision
*.dcl = svn:eol-style=native;svn:keywords=Author Date Id Revision
*.doc = svn:mime-type=application/msword
*.dsp = svn:eol-style=CRLF
*.dsw = svn:eol-style=CRLF
*.dtd = svn:eol-style=native;svn:keywords=Author Date Id Revision
*.egrm = svn:eol-style=native;svn:keywords=Author Date Id Revision
*.ent = svn:eol-style=native;svn:keywords=Author Date Id Revision
*.fn = svn:eol-style=native;svn:keywords=Author Date Id Revision
*.ft = svn:eol-style=native;svn:keywords=Author Date Id Revision
*.fv = svn:eol-style=native;svn:keywords=Author Date Id Revision
*.g = svn:eol-style=native;svn:keywords=Author Date Id Revision
*.gif = svn:mime-type=image/gif
*.grm = svn:eol-style=native;svn:keywords=Author Date Id Revision
*.gz = svn:mime-type=application/x-gzip
*.h = svn:eol-style=native;svn:keywords=Author Date Id Revision
*.handlers = svn:eol-style=native;svn:keywords=Author Date Id Revision
*.htc = svn:eol-style=native;svn:keywords=Author Date Id Revision
*.html = svn:eol-style=native;svn:keywords=Author Date Id Revision
*.ico = svn:mime-type=image/x-icon
*.ihtml = svn:eol-style=native;svn:keywords=Author Date Id Revision
*.in = svn:eol-style=native;svn:keywords=Author Date Id Revision
*.java = svn:eol-style=native;svn:keywords=Author Date Id Revision
*.jmx = svn:eol-style=LF
*.jpg = svn:mime-type=image/jpeg
*.jpg= svn:mime-type=image/jpeg
*.js = svn:eol-style=native;svn:keywords=Author Date Id Revision
*.jsp = svn:eol-style=native;svn:keywords=Author Date Id Revision
*.junit = svn:eol-style=native;svn:keywords=Author Date Id Revision
*.jx = svn:eol-style=native;svn:keywords=Author Date Id Revision
*.m = svn:eol-style=native;svn:keywords=Author Date Id Revision
*.m4 = svn:eol-style=native;svn:keywords=Author Date Id Revision
*.manifest = svn:eol-style=native;svn:keywords=Author Date Id Revision
*.mdo = svn:eol-style=native;svn:keywords=Author Date Id Revision
*.meta = svn:eol-style=native;svn:keywords=Author Date Id Revision
*.mf = svn:eol-style=native;svn:keywords=Author Date Id Revision
*.mk = svn:eol-style=native;svn:keywords=Author Date Id Revision
*.mod = svn:eol-style=native;svn:keywords=Author Date Id Revision
*.mov = svn:mime-type=video/quicktime
*.mpg = svn:mime-type=video/mpeg
*.ms = svn:eol-style=native;svn:keywords=Author Date Id Revision
*.n3 = svn:eol-style=native;svn:keywords=Author Date Id Revision
*.nroff = svn:eol-style=native;svn:keywords=Author Date Id Revision
*.patch = svn:eol-style=native;svn:keywords=Author Date Id Revision
*.pdf = svn:mime-type=application/pdf
*.pen = svn:eol-style=native;svn:keywords=Author Date Id Revision
*.php = svn:eol-style=native;svn:keywords=Author Date Id Revision
*.pl = svn:eol-style=native;svn:keywords=Author Date Id Revision
*.pm = svn:eol-style=native;svn:keywords=Author Date Id Revision
*.png = svn:mime-type=image/png
*.pod = svn:eol-style=native;svn:keywords=Author Date Id Revision
*.pom = svn:eol-style=native;svn:keywords=Author Date Id Revision
*.ppt = svn:mime-type=application/powerpoint
*.project = svn:eol-style=native;svn:keywords=Author Date Id Revision
*.properties = svn:eol-style=native;svn:keywords=Author Date Id Revision
*.py = svn:eol-style=native;svn:keywords=Author Date Id Revision
*.rb = svn:eol-style=native;svn:keywords=Author Date Id Revision
*.rdf = svn:eol-style=native;svn:keywords=Author Date Id Revision
*.rnc = svn:eol-style=native;svn:keywords=Author Date Id Revision
*.rng = svn:eol-style=native;svn:keywords=Author Date Id Revision
*.rnx = svn:eol-style=native;svn:keywords=Author Date Id Revision
*.roles = svn:eol-style=native;svn:keywords=Author Date Id Revision
*.rss = svn:eol-style=native;svn:keywords=Author Date Id Revision
*.schemas = svn:eol-style=native;svn:keywords=Author Date Id Revision
*.sh = svn:eol-style=native;svn:keywords=Author Date Id Revision
*.sh = svn:eol-style=native;svn:executable
*.sql = svn:eol-style=native;svn:keywords=Author Date Id Revision
*.svg = svn:eol-style=native;svn:keywords=Author Date Id Revision
*.tcl = svn:eol-style=native;svn:keywords=Author Date Id Revision
*.tgz = svn:mime-type=application/x-compressed
*.tif = svn:mime-type=image/tiff
*.tiff = svn:mime-type=image/tiff
*.tld = svn:eol-style=native;svn:keywords=Author Date Id Revision
*.txt = svn:eol-style=native;svn:keywords=Author Date Id Revision
*.types = svn:eol-style=native;svn:keywords=Author Date Id Revision
*.vm = svn:eol-style=native;svn:keywords=Author Date Id Revision
*.vsl = svn:eol-style=native;svn:keywords=Author Date Id Revision
*.wsdd = svn:eol-style=native;svn:keywords=Author Date Id Revision
*.wsdl = svn:eol-style=native;svn:keywords=Author Date Id Revision
*.xargs = svn:eol-style=native;svn:keywords=Author Date Id Revision
*.xcat = svn:eol-style=native;svn:keywords=Author Date Id Revision
*.xconf = svn:eol-style=native;svn:keywords=Author Date Id Revision
*.xegrm = svn:eol-style=native;svn:keywords=Author Date Id Revision
*.xgrm = svn:eol-style=native;svn:keywords=Author Date Id Revision
*.xhtml = svn:eol-style=native;svn:keywords=Author Date Id Revision
*.xhtml2 = svn:eol-style=native;svn:keywords=Author Date Id Revision
*.xlex = svn:eol-style=native;svn:keywords=Author Date Id Revision
*.xlog = svn:eol-style=native;svn:keywords=Author Date Id Revision
*.xls = svn:mime-type=application/excel
*.xmap = svn:eol-style=native;svn:keywords=Author Date Id Revision
*.xml = svn:eol-style=native;svn:keywords=Author Date Id Revision
*.xroles = svn:eol-style=native;svn:keywords=Author Date Id Revision
*.xsamples = svn:eol-style=native;svn:keywords=Author Date Id Revision
*.xsd = svn:eol-style=native;svn:keywords=Author Date Id Revision
*.xsl = svn:eol-style=native;svn:keywords=Author Date Id Revision
*.xslt = svn:eol-style=native;svn:keywords=Author Date Id Revision
*.xsp = svn:eol-style=native;svn:keywords=Author Date Id Revision
*.xtest = svn:eol-style=native;svn:keywords=Author Date Id Revision
*.xul = svn:eol-style=native;svn:keywords=Author Date Id Revision
*.xweb = svn:eol-style=native;svn:keywords=Author Date Id Revision
*.xwelcome = svn:eol-style=native;svn:keywords=Author Date Id Revision
*.zip = svn:mime-type=application/zip
.htaccess = svn:eol-style=native;svn:keywords=Author Date Id Revision
INSTALL = svn:eol-style=native;svn:keywords=Author Date Id Revision
KEYS = svn:eol-style=native;svn:keywords=Author Date Id Revision
LICENSE = svn:eol-style=native;svn:keywords=Author Date Id Revision
makefile = svn:eol-style=native;svn:keywords=Author Date Id Revision
Makefile = svn:eol-style=native;svn:keywords=Author Date Id Revision
NOTICE = svn:eol-style=native;svn:keywords=Author Date Id Revision
README = svn:eol-style=native;svn:keywords=Author Date Id Revision
abs-linkmap = svn:eol-style=native;svn:keywords=Author Date Id Revision
abs-menulinks = svn:eol-style=native;svn:keywords=Author Date Id Revision
http://maven.apache.org/developers/svn-eol-style.txt
svn propset svn:eol-style native filename
To set the keywords on an alredy checked in file, run:
svn propset svn:keywords "Author Date Id Revision" filename
Then run svn commit to commit the change.
SSH Configuration.
If you will be accessing the ptII repository with read/write
access, then you will need to do a little more configuration concerning
passwords.
c:/cygwin/bin/ssh.exe window will pop up each time ssh
is called.
Window | Preferences | Team | SVN | SVN interface | SVNKit (Pure Java)
| OK
Check Out Ptolemy II from the Subversion repository
Below we describe how to set up Eclipse so Eclipse
manages the Subversion interaction.
Window | Show View | Other | SVN | SVN Repositories
New and set the url.
To check out the ptII svn repository with read-only access:
https://source.eecs.berkeley.edu/svn/chess/ptII
or
svn://source.eecs.berkeley.edu/chess/ptII
https:// or
svn:// because
they will be accessing the tree with read-only Subversion access.
If you have an
ssh account on source.eecs.berkeley.edu, then check out ptII with
read/write access:
svn+ssh://source.eecs.berkeley.edu/home/svn/chess/ptII
Or, if your user id on source.eecs is different than your current user id
on your machine:
svn co svn+ssh://yourID@source.eecs.berkeley.edu/chess/ptII
Read/write users will be prompted for their source.eecs.berkeley.edu
username and password. This typically happens more than once since in case the svn+ssh protocol is being used passwords are not cached.
Trust or Trust Always. For details and
a workaround, see Certificate is not issued by a trusted authority.
trunk and select Find/Check out As
Follow the wizard, creating selections as follows:
Be sure to check out the
trunk not the
entire tree, which include all the branches and the trunk.
Check out as a project configured using the New Project Wizard, then hit Finish.
Java | Java Project, then hit Next.
set "Project Name" to: ptII
set "Project Layout" to Use project folder as root for sources and class files.
This is done so that $PTII/bin will contain the Ptolemy II command line scripts instead of the
*.class files created by Eclipse.
then you probably did not change "Project Layout" as per above. Click cancel and recreate the Java Project.
The project you created, ptII, contains resources other than the standard .project file. If any of those resources have the same name and relative location of a resource you are checking out, the local resource will be replaced with the resource from the repository
Note:If you did not disable build automatically, as
suggested above, then Eclipse will build the project and produce
thousands of errors. This is not really a problem. You will
fix the errors below with the .classpath.default file.
Window | Open Perspective | Java
in the menu.
By default, Eclipse offers a "Package Explorer" as the main navigation
mechanism for the source files. Many developers much
prefer to use the "Navigator."
To get the Navigator, select
Window | Show View | Navigator
in the menu.
You can now browse the source files.
.classpath.default and copy it into a new file called
.classpath.
Note that you can use the Eclipse Navigator browse to the
.classpath.default file, open the file, copy the contents,
open .classpath, paste the contents and save .classpath.
Or, you can use Windows Explorer or the shell.
Window | Open Perspective | Java Go to the Package Explorer or the Navigator.
Right mouse click on the ptII icon and select Refresh.
Note:If you do not do copy .classpath.default
and select "Refresh", then Eclipse will produce
thousands of errors. This is not really a problem. It reflects
that you probably don't have installed many optional packages that
are needed to build subsets of Ptolemy II. You can ignore the errors
(not advised, since they will mask errors you make), or you can copy
the .classpath.default file and rebuild.
Running configure
Alternatively, you can run ./configure,
which searches your environment for 3rd party packages and updates
.classpath.
configure$PTII/bin on the command line, you will probably
want to run the following commands within Cygwin bash:
cd $PTII/bin
make
configure, perform a Refresh on the ptII project
by Window| Open Perspective | Java
Go to the Package Explorer or the Navigator.
Right mouse click on the ptII icon and select Refresh.
This will
cause Eclipse to see the new ptII/.classpath and to build
the project (or you may have to manually rebuild if you turned
off automatic rebuild).
Project |
Vergil
ptII
ptolemy.vergil.VergilApplication
You may now wish to read the Using Vergil tutorial.
Run | Add/Remove Breakpoint
Run | Run.
On the Main
tab, select the Ptolemy II package and enter
ptolemy.vergil.VergilApplication as Main class.
Run | Debug, and
as above. Open the Lorenz CT demo from the Quick Tour and run it.
svn cp command. Do
not drag and drop directories as the directories contain a .svn directory
that will have settings for the source location. Instead, use svn cp.
See also svn mv.
tcl.lang.Shell.
alljtests.tcl or any individual test tcl file.
(E.g. SimpleDelay.tcl).
Or, leave the "Program arguments" field blank and when ptjacl is running (see below), enter text in to the Eclipse console.
-Dptolemy.ptII.dir=your PtII directory
-Dptolemy.ptII.dir=c:/hyzheng/ptII).-Dptolemy.ptII.dir="c:/my workspace/ptII").
C:\hyzheng\ptII\ptolemy\domains\de\lib\test)
workspace directory in the
Eclipse directory. The workspace directory will only
appear if you have already run Eclipse. Note that removing the
workspace directory will cause Eclipse to 'forget'
about any projects that you may have set up
If, when building, the Problem tab shows "Assert cannot be resolved", then the problem is that Junit is not being found.
If you have problems where clicking on build briefly flashes up
a window, look in $PTII/.classpath for and empty
exclusion that looks like ||
If you have problems with the classpath, look in the
workspace/.metadata/log file that is in
the directory where eclipse is installed. For more information
about the .metadata directory, see
below.
Basically, when eclipse starts up, it might try to update
H:/workspace/.metadata
. The solution is covered in
http://www.eclipse.org/documentation/html/plugins/org.eclipse.platform.doc.user/doc/tasks/running_eclipse.htm:
The way I figured this out was by running Norton Antivirus and
doing View -> File System Realtime Scan Statistics and then I noticed
that my machine was updating H:/workspace/.metadata
I think I introduced the problem by clicking on the Eclipse.exe binary and selecting Pin to Start Menu. My solution was to remove the Eclipse bogus entry in the start menu and then create a shortcut, change Start in property and then pin that shortcut to my start menu.
In this example, we copy ptolemy/actor/lib/Ramp.java and create a new actor
called Ramp2
<property name="_icon" class="ptolemy.vergil.icon.AttributeValueIcon">
          <property name="attributeName" value="function"/>
          <property name="displayWidth" value="11"/>
        </property>
      </entity>

      <entity name="Bmh" class="ptolemy.actor.lib.string.Bmh">
       <doc>Boyer Moore Horspool</doc>
      </entity>

      <entity name="StringIndexOf" class="ptolemy.actor.lib.string.StringIndexOf">
       <doc>Output the length of an input string</doc>
      </entity>
PTDIST =        $(PTPACKAGE)$(PTVERSION)
PTCLASSJAR = 	$(PTPACKAGE).jar

# Keep this list alphabetized.
JSRCS = \
        Bmh.java \
	StringCompare.java \
	StringFunction.java \
	StringIndexOf.java \
	StringLength.java \
	StringMatches.java \