The diva.graph demo

How to run the demo
This simple demo shows the diva graph package in action. It's not meant to be flashy, but to illustrate the
basic functionality of the package, and hopefully illuminate the package architecture a bit. It consists of three
parts, incremental programmatic construction of a simple graph, user editing of the graph, and finally automatic
layout of the graph using a simple algorithm.
Two windows
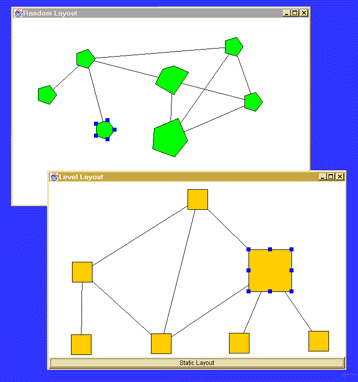
There are two windows. They are used to illustrate the elegance of the model-view separation. Adding a node
in one automatically generates a node in the other. It is also easy to customize the look of the nodes--take a
look at the source of the demo for more on this.
Initial construction
The graph initialization is done without any knowledge of the graph's display. This how we envision typical
applications will interact with the package; all user interface code (even application-specific code), will be
disconnected from the application's core data structure and basic semantics. Basic graph algorithms and other graph
operations operate on the graph data structure, and side-effects changes to the view indirectly.
The layout algorithm used here is described in more detail below, but basically levelizes the graph and places
it based on the levels. It is a static algorithm used incrementally, so with every graph modification the layout
algorithm is executed from scratch. We hope to write a series of incremental algorithms in the near future.
User editing
The user editing in this demo is very rudimentary (and is actually implemented in a very crude way which will
definitely be replaced before the first real release). The graph editor contains three operations, all using the
LEFT mouse button.
- Select nodes - Select nodes by clicking on them, or drag a rectangle around multiple nodes. Deselect
nodes by clicking on the background.
- Reshape nodes - Drag the grab handles of a selected node and that node will reshape in an appropriate
manner.
- Move nodes - Select one or more nodes, then drag on the body of one of the nodes to move the selected
nodes. The edges connected to the selected nodes will also update accordingly.
- Add nodes - Control-click on the background to add a new node.
- Add edges - Select a node and then control drag from the node to create an edge from the node. Drop
the edge on another node (the other node should highlight) to complete the operation. Self-looping edges are not
currently supported.
- Layout - Press the layout button. The layout algorithm does not work properly in some configurations
of the graph--this bug will be fixed in subsequent versions.
When a node or edge is added to the graph, the following set of events occur. Here we walk through the creation
of an edge (the addition of a node is a nearly symmetric operation, but slightly more simple). On completion of
the user operation (the edge drag), an edge is added to the graph model, which in turn side-effects an event to
be delivered to all model listeners. The editor that created the edge already has a view of the edge, so it does
nothing. Any other views on the graph render the edge in whatever way is appropriate to that view, and then update
their layout.
Layout
There are two layouts shown here. The first layout is a level-based layout, based on an algorithm by Ulfar Erlingsson
at Cornell. It has a bug which causes it to fail in certain situations. It has something to do with the algorithm
leaving extra nodes/edges in the graph once it is finished with the layout. It also doesn't handle cyclic graphs
properly. All shortcomings of this algorithm will be remedied in the next release. Please bear with us on this
one.
The second layout is random. It is the simplest possible incremental layout, and hopefully there are
no bugs in it. Notice that when a new node is added in the DAG window, a new node is added in a random location
on the other window, but none of the other nodes work. We hope to add a set of useful incremental layouts
in the near future.
| 


