pigi
. Do this by typing a control-d character in the vem
console window. A dialog box may appear with a menu of facets that vem
thinks have been changed. Since all of these belong to the user "ptolemy", you do not want to save them. If it appears, do not select any of them. Just click "OK". A a warning window may then appear telling you that closing the console window will terminate the program. Just click "Yes". In this section, we will show how to create your own universes with a simple example that is very similar to the
sinMod
demo explored above. First, be sure you are in a directory where you have write permission, like your home directory.
mkdir example
cd example
pigi
:
pigiYou will see the message:
creating initial facet "init.pal"Wait until the welcome window with the picture of Ptolemy appears. We are now ready to learn about the basics of using
vem
.
init.pal
", is special because pigi
always opens a facet by this name in the directory in which it starts. Convention in Ptolemy dictates that "init.pal
" should be used to store icons representing complete applications, so instead of using this facet, we will create a new one.
- Select the open-facet command from the "Window"
pigi
menu (shift-middle-button). Alternatively, type an "F". You will get a directory browser that looks like this:- Replace the name "init.pal" in the text widget with "wave" and click the "OK" button (or hit the return key). A quick way to delete the "init.pal" is using control-u. A new blank window will appear.
- Select the open-palette command from the "Window"
pigi
menu. Alternatively, type an "O". -
Pigi
will present a palette menu. Select the "sdf" palette by clicking the left button in the box next to "$PTOLEMY/src/domains/sdf/icons/main.pal" (the first entry) and then click on "OK". - The palette that opens is shown on the left of figure 2-7.
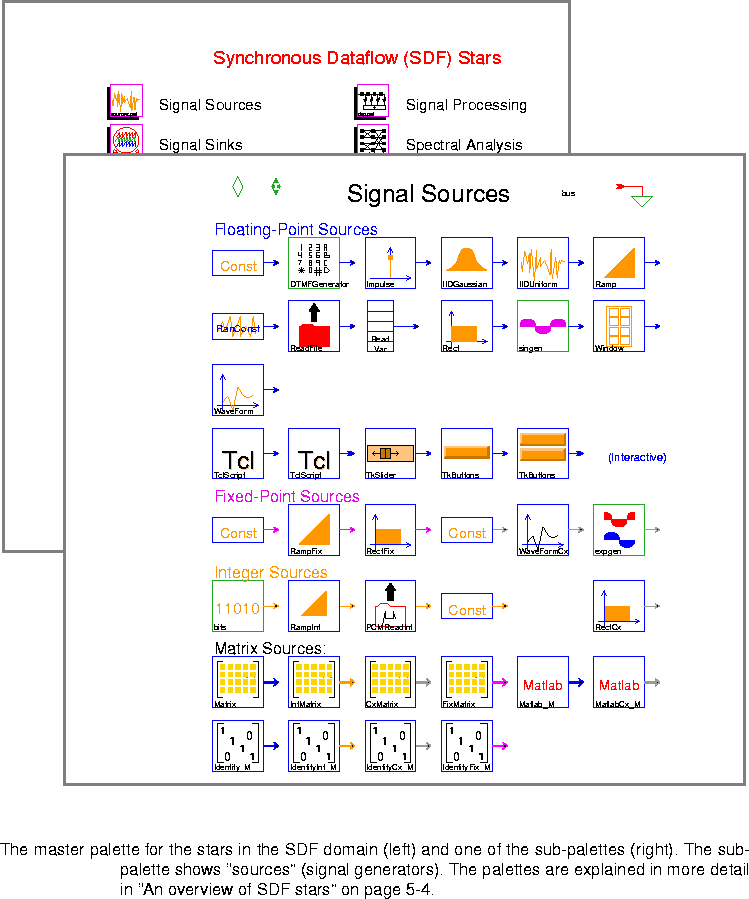
vem
commands for manipulating window displays. Vem
uses post-fix commands. This means that the user enters the arguments to a command before the command name itself. Arguments appear in the vem
console window as the user enters them. Note that although the text of what the user enters is displayed in the console window, the cursor should be in one of the facet windows.There are several types of arguments. Each argument type is entered in a different way. All graphics arguments are created with the left mouse button. The five types of arguments are listed below:
Point:
Box:
Line:
Object:
Text:
Menus
: Click the middle-button for vem
commands, shift-middle-button for pigi
commands. Menus are of the "walking" variety, as explained before.
Key bindings
: Commands can be bound to single keys and activated by just pressing the key. Key bindings are also called "single-key accelerators", and are case sensitive. The key bindings are summarized in table
2-2 on page 2-7 and table
2-3 on page 2-11.
Type-in
: Type a colon followed by the command name. This is rarely used by Ptolemy users, but vem
experts use it occasionally.
Vem
does not display these labels if they would be too small.
vem
pan command can also take as an argument a point which will indicate the new center of the window. Recall that the argument must be entered first. Place a point somewhere in the palette window by clicking the left button, and type "p". The location of your point became the center of the window.
vem
open-window command can take a box as an argument. Draw a box in the palette window by dragging the left mouse button and then type "o", or find the open-window command in the vem
menu.
Vem
has an implicit grid to which points snap. The default snap resolution is suitable for making Ptolemy universes.
vem
window) with "control-d".
Ramp
". This star is at the upper right of the sources palette. Its icon has an orange triangle. To do this:
- Create a point anywhere in the window by clicking the left button.
- Move the cursor over the "
Ramp
" icon in the palette and press the "c" key. This is a key binding that executes the vem
"create" command. - You have just created an instance of the "
Ramp
" icon. The actual data that describes how the "Ramp
" icon should be drawn is stored in another facet (an "interface facet"). An instance of the "Ramp
" icon points to this facet.
Ramp
instance and then delete it.
Ramp
instance next to the first one: place a point near the original Ramp
, place the cursor over the Ramp
icon in the palette and press "c". Actually, you don't have to use the icon in the palette - you could also put the cursor over the already existing Ramp
icon to achieve the same effect. - Place the cursor over the new
Ramp
icon and execute select-objects by typing "s". This creates an object argument on the vem
command line. This is necessary because the vem
delete-objects command takes arguments of type "object". The select-objects command takes point, box, and/or line arguments and turns the items underneath them into object arguments. The unselect-objects command ("u") does the reverse of select-objects. - Execute delete-objects by typing "D" (upper-case!). This deletes the objects we selected previously.
- You could also have deleted the newly created Ramp with the undo command ("U"). This is an infinite undo, so you can backtrack through all changes you have made since starting the
vem
session by repeatedly executing the undo command. - Occasionally when you use the select and unselect commands, the objects are not redrawn correctly. When this happens, use the
vem
redraw-window command, "control-l" (lower case L), to redraw.
Sin
" icon to the right of the Ramp. "Sin
" is in the "nonlinear" palette, where icons are arranged alphabetically by name. Make sure it does not overlap with the Ramp icon. If it overlaps, you can delete it and create a new one. - Create an "
XMgraph
" instance to the right of the Sin
icon. "XMgraph
" is the first icon in the first row of the "sinks" palette.
Ramp
, a Sin
, and an XMgraph
. Your facet should look something like this:Next, we will connect them together.
Ramp
output to the Sin
input using the following steps:
- Draw a line between the output of the
Ramp
and the input of the Sin
: put the cursor over the Ramp
output, double-click on the left mouse button, drag the cursor to the Sin
input, and then let up on the mouse button. If the two terminals are not on a horizontal line, you can bend the line by momentarily releasing the mouse button while dragging it. - Type "c" (for create) to create a wire. Notice that the create command creates wires or instances depending on the type of arguments it is called with.
- If you need to delete a wire, you can draw a box around it (click and drag with the mouse), select it (press "s"), and then delete it ("D").
Sin
output to the XMgraph
input in a similar way.
pigi
"Exec" menu, or type an "R". - Enter "100" for "When to stop". Do this by typing "control-u" to remove the default entry in the text widget and typing 100. This specifies that the system should be run through 100 "iterations". What constitutes an iteration is explained in chapter 5, "SDF Domain" on page 5-1. For this simple system, it is just the number of samples processed.
- Clicking on the GO button or typing a return character will run the system.
Ramp
star. The execution of the XMgraph
star created this new window to show the output of our simulation. To remove this window, click on the "Close" button or press "control-d" in it.
vem
save-window command. It is wise to periodically save your work in case the editor or computer system fails unexpectedly.
Ramp
star has a set of default parameters which cause it to generate output values with an increment that is too large. We can change the parameters of as follows:
Ramp
icon and execute edit-params in the pigi
menu (or type "e"). A dialog box will appear that shows the current parameters. - Replace the value of step with "PI/50". (You can use "control-u" to erase the old value.) Finally, click the "OK" button to store the new parameters. This is an example of Ptolemy's parameter expression syntax, explained above.
pigi
command "Extend:make-schem-icon", or "@".
pigi
in this same directory, the first window you will see will be this "init.pal" window.
- Type "control-d" in the
vem
console window. If nothing needed to be saved, the program exits immediately. Otherwise, a dialog box appears asking you to choose buffers to be saved. Unfortunately, as of this writing, some of the buffers listed may have already been saved and do not need to be saved again. The program is overly cautious. To indicate which of the listed buffers you wish to save, click on the box to the left of each name. Then click on the "OK" button. - A final warning appears telling you that closing the console window will terminate the program. Click on "Yes".
Copyright © 1990-1997, University of California. All rights reserved.